
When we pick our potatoes, it’s always a joyful time. When you dig in the ground and find those beautiful potatoes hiding beneath, it’s like finding treasure that has been buried. The harvest is fun, but what happens to the potato trees afterward? A lot of us just throw them away. You are doing a good thing by putting these plants in your trash pile, but there is still a lot more you can do. We’re going to show you two great ways to use those potato plants that will not only improve the soil in your garden beds but also help you make a strong, if smelly, liquid fertilizer in just a few days. Let’s start right away.
Using old potato plants to improve the soil

After harvesting your potatoes, begin by gathering all the plants that are still alive. Make sure to carefully check them and cut off any parts that have pests or disease on them. You would rather not add any problems to the dirt or compost. Cut the excellent parts into little pieces after you’ve picked them out. Cutting food into smaller pieces accelerates its breakdown, releasing more nutrients. Make sure that these chopped-up potato plants cover the whole surface of your yard bed. In this straightforward step, the nutrients that the plants took from the dirt to grow are reused.
Add neem cake powder to the chopped plants to improve this process. Neem cake powder is a natural result of neem seeds. It is full of nutrients and keeps pests away. Not only does it improve the soil, but it also keeps dangerous nematodes and other pests away. After putting down the neem cake, add a layer of soil or fully decomposed manure over the chopped plants. This layer is critical because it adds beneficial bacteria that break down organic matter faster and make the soil healthier. Lastly, lightly water the bed to start the process of breaking down the matter.
It could take two to three months or even longer for potato plants to fully break down in a regular compost pile. But this method makes breakdown happen a lot faster. The chopped plants will almost completely break down in three to four weeks, adding organic matter and important nutrients to the soil. This method works well for your flower beds, is quick, and doesn’t waste time.
Potato plants can be used to make a liquid fertilizer.
A quick, easy, and nutrient-filled way to help your plants grow is to make your own liquid fertilizer from potato plants. This method takes advantage of the natural breakdown of potato plants to make a liquid that is full of nutrients and beneficial bacteria. Let’s examine the process of creating this exceptional homemade fertilizer step by step.
Step 1: Prepare the Container and Water
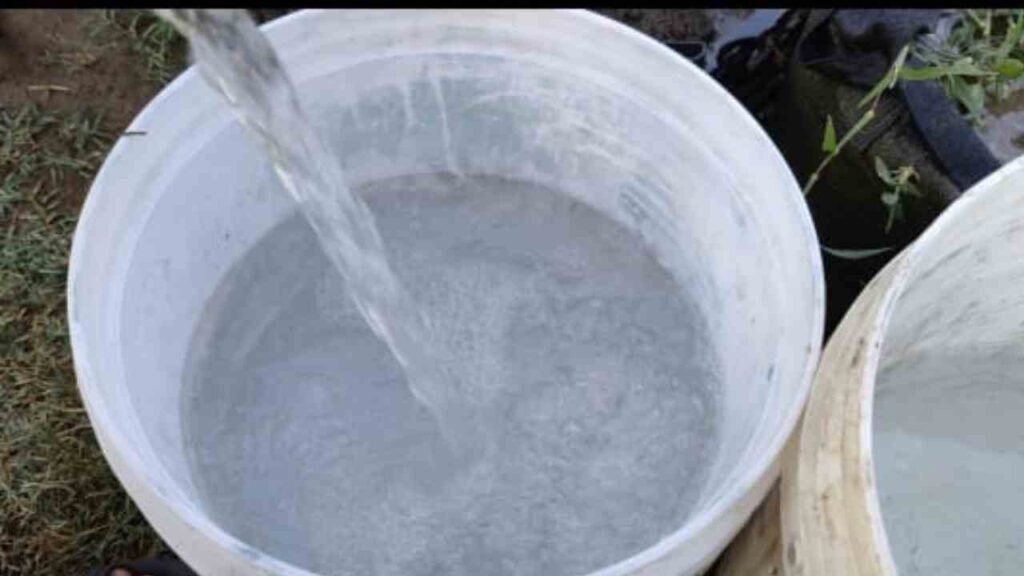
To make liquid fertilizer, the first thing you need to do is get a big jar ready. The container will hold the mixture of water and plant matter. This variant is the best option because it doesn’t contain chlorine or other poisons and is easy to get. If you don’t have access to rainwater, you can still use tap water. You can use tap water instead, but make sure you let it sit for at least one or two days. During this time, any chlorine in the tap water will have time to evaporate, protecting the beneficial bacteria in your fertilizer.
Step 2: Add the Potato Plants and Compost
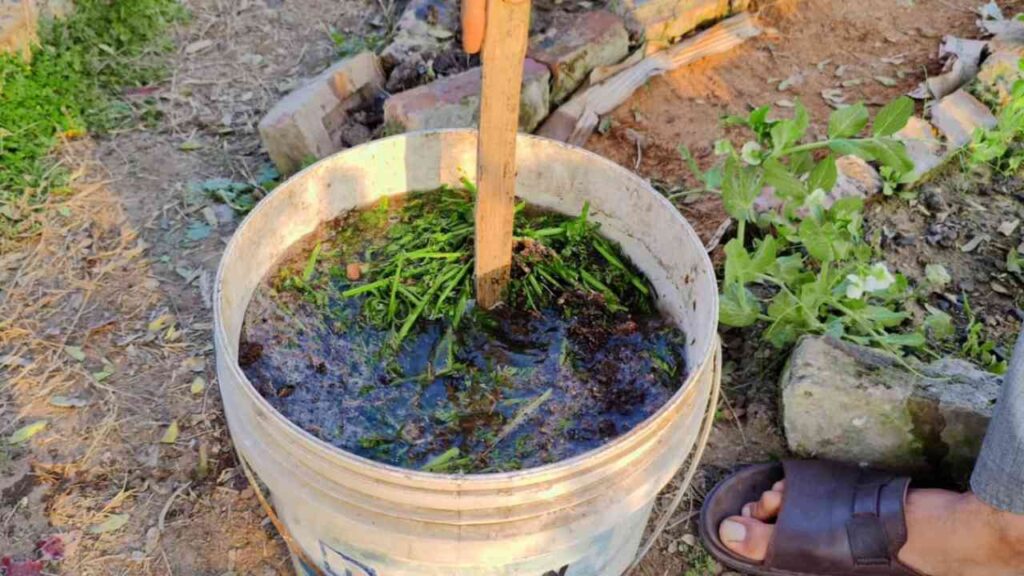
After adding water to the pot, it’s time to add the chopped potato plants. You can use the plant’s remaining parts after the potatoes are picked. To add more nutrients to the mix, add a few handfuls of compost or dung that has broken down. These biological materials will break down over time, letting important minerals like potassium, phosphorus, and nitrogen into the water. When you mix waste with potato plants, you get a strong, nutrient-rich base for your fertilizer.
Step 3: Stir and Cover the Mixture

After adding all the ingredients, give the mixture a thorough stir to make sure everything is spread out evenly. This speeds up the breakdown process so that the nutrients and beneficial microbes can start doing their job. Next, put a loose lid on the jar. Make sure not to tightly seal the container because the breakdown process will let gases out that need to go somewhere. A lid or cloth that doesn’t fit too tightly will let air flow but still keep out dirt.
Step 4: Let the Mixture Sit for Seven Days
Place the jar in a shaded area and leave it there for a minimum of seven days. This time, the potato plant matter and fertilizer will keep breaking down, letting beneficial nutrients into the water. The mixture will also attract beneficial bacteria, essential for enhancing soil fertility and promoting plant growth. Wait a little while longer; this process needs time to get strong enough for the liquid fertilizer to work.
Step 5: Dilute and Apply the Fertilizer
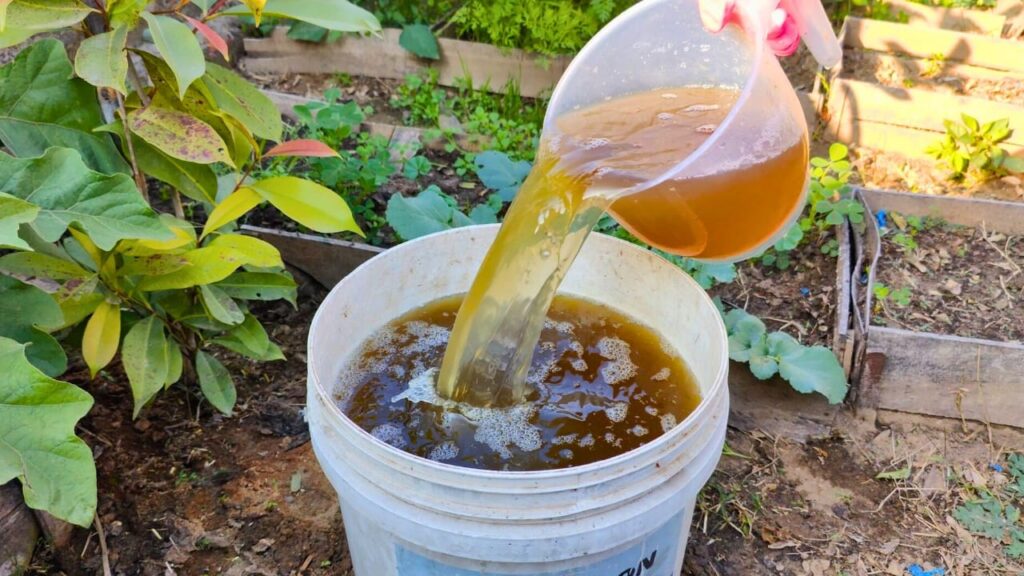
Your liquid fertilizer is ready to use after seven days. However, its strength necessitates dilution before use. One part liquid fertilizer to ten parts water is the right amount to dilute it. This procedure makes sure that the solution is gentle enough not to hurt your plants but strong enough to give them a nutritional boost. The final mixture will have many important nutrients and beneficial bacteria that help plants stay healthy, make the soil stronger, and make it more fertile.
Step 6: Apply to Your Plants

Due to the natural fermentation process, this liquid fertilizer may have a strong smell. Don’t let that put you off—it means it’s strong and effective! When applied, it nourishes plants so they grow strong and healthy. This homemade liquid fertilizer will give your plants an obvious boost, encouraging strong growth and better yields whether you’re growing herbs, flowers, or vegetables.
Conclusion
You can reuse your potato plants and give back to your yard in these two simple but very effective ways. The first method improves your dirt directly, and the second method gives you an easy-to-use liquid fertilizer that helps plants grow. Don’t throw away those potato plants. Instead, try these tips and see how they improve your yard.
Please like, share, and subscribe to our site if this article helped you. Refer to our other gardening tips, fertilizers, and sprays! Have fun growing! 🌱